Newly Added Crochet Patterns
- Afghans | Fashions in Wool | Styled by Hilde Volume 92
- Crochet for Tables | Book No. 202 | The Spool Cotton Company
- Elegant Throw Pattern #692
- Hexagon Afghan Pattern #689
- Potholder Pattern #9430
- Potholder Pattern #9417
- Star Tablecloth Book | Book 28 | American Thread Company
- New Table Talk | Book No. 157 | The Spool Cotton Company
- Tables of Tomorrow | Book No. 135 | The Spool Cotton Company
- New Table Settings | Book No. 95 | The Spool Cotton Company
- Lilac Time Tablecloth Pattern #7651
- Muffin Cozy Pattern #7629
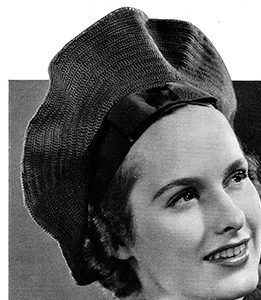
Angel Face Hat Pattern #2358

Adjustable to any headsize.
MATERIALS:
J. & P. Coats Knit-Cro-Sheen, 3 balls of any color.
Milward's steel crochet hook No. 9.
2¼ yds. grosgrain ribbon, 1½ inches wide.
Starting at center of crown, ch 4. 1st rnd: 14 d c in 4th ch from hook. Join with sl st to 4th ch of ch-4 first made. 2nd rnd: 2 s c in same place as sl st, * s c in each of next 2 d c, 2 s c in next d c. Repeat from * around, join (20 s c). 3rd rnd: Ch 3 (to count as d c), d c in same place as sl st, * d c in next s c, 2 d c in next s c. Repeat from * around, join. 4th rnd: 2 s c in same place as sl st, * s c in each of next 2 d c, 2 s c in next d c. Repeat from * around, join (40 s c). Work in this manner, alternating s c-rnds and d c-rnds, making necessary increases to keep work flat, until piece measures 12 inches in diameter, ending with an s c-rnd—to inc., make 2 sts in one st. Now work 4 rnds without increasing. Next rnd: Work in pattern, join. Ch 1, turn. Hereafter work in pattern, turning at end of each rnd and decreasing to correspond with increases made before the 4 even rnds (be sure to keep work flat) until opening measures 9 inches in diameter, ending with a d c-rnd—to dec., work off 2 sts as 1 st. Hereafter work is done in rows instead of rnds, always decreasing as necessary to keep work flat. Next row: Sl st in each of next 3 sts, work in pattern to within last 3 sts. Ch 3, turn (3 sts decreased at both ends of row). Following row: Dec. 3 sts by working off 2 sts as 1 st 3 times, work to within last 6 sts, dec. 3 sts as at beginning of row, turn. Repeat the last 2 rows alternately until wider part (center front) measures 3½ inches deep from the 4 even rnds. Now work 2 rnds of s c all around opening. Fasten off.
Finishing … Steam beret through a damp cloth. Cut 2 pieces of ribbon, each ½ inch longer than headsize desired. Paste the 2 pieces of ribbon together with rubber cement (thus making 1 band of double thickness). Sew ends of band together, and sew to edge of beret with neat over-and-over stitches. Paste remaining ribbon as before, and make a flat bow. Sew bow to band as in illustration.
This is a very practical model because it can be adapted to any type of costume. The "halo" is our version of the ever-popular beret. Pulled well forward and worn over the eye, it becomes a Scotch Tam O'Shanter. Omit the bow and add a pin for your smart afternoon ensemble, or add a quill at right angles for your sport costume.
Tisket-a-Tasket Hat Pattern
Tam O'Shanter Hat and Bag Set Pattern
Pill Box Hat and Bag Set Pattern
Angel Face Hat Pattern
Classic Bag Pattern
Good News Hat Pattern
Pieces of Eight Bag Pattern
Runabout Hat Pattern
Cock o' the Walk Hat Pattern
Algiers Hat Pattern
The Edwardians Hat and Bag Set Pattern
Sky Top Hat Pattern
Hour Glass Hat Pattern
Loop the Loop Bag Pattern


