Newly Added Crochet Patterns
- Afghans | Fashions in Wool | Styled by Hilde Volume 92
- Crochet for Tables | Book No. 202 | The Spool Cotton Company
- Elegant Throw Pattern #692
- Hexagon Afghan Pattern #689
- Potholder Pattern #9430
- Potholder Pattern #9417
- Star Tablecloth Book | Book 28 | American Thread Company
- New Table Talk | Book No. 157 | The Spool Cotton Company
- Tables of Tomorrow | Book No. 135 | The Spool Cotton Company
- New Table Settings | Book No. 95 | The Spool Cotton Company
- Lilac Time Tablecloth Pattern #7651
- Muffin Cozy Pattern #7629
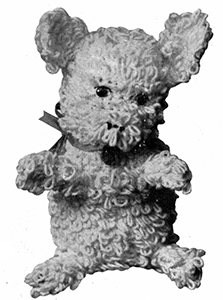
Fluffy Puppy Pattern

Here's a cuddly, "Fluffy Puppy" that every child will love. To be crocheted of ENTERPRISE Yarn. It is quickly made, and when soiled can be washed to be as good as new.
MATERIALS—
3 balls of White ENTERPRISE Yarn.
1 strand each of black and red embroidery thread.
A small piece of red material for tongue—cotton or felt will do.
2 small black buttons, or beads, for eyes.
A piece of cotton batt or kapok, for stuffing.
Steel crochet hook No. 1.
DIRECTIONS: Body—Chain 8, join with sl st to form a ring.
Row 1: Ch 3, 16 dc with loops in ring (make loop by twisting thread over forefinger away from you and drawing needle through all three loops), sl st into 3rd st of ch-3 at beginning of row.
Row 2: Ch 3, * 1 dc with loop in 1st dc, 2 dc with loops in next dc * repeat between * to end of row, sl st into ch-3 at beginning.
Rows 3 and 4: Same as Row 2.
Row 5: Ch 3, 1 dc with loop in each st, sl st into ch-3 at beginning of row.
Repeat Row 5, until body is 6 inches long. Fasten off.
Legs and Tail—Ch 6, join with sl st to form a ring.
Row 1: Ch 3, 9 dc with loops into ring, join with sl st in 3rd st of ch-3 at beginning.
Row 2: Ch 3, 1 dc with loop in each dc, sl st into ch-3 at beginning.
Repeat Row 2 — 4 more times. Fasten off. Make 4 more pieces like this—4 legs and 1 tail.
Ears—Ch 11, turn.
Row 1: 1 dc with loop in 4th st from hook, 1 dc with loop in remaining 7 sts, ch 1, turn.
Row 2: 1 sc in each dc across row, ch 3, turn.
Row 3: 1 dc with loop in each sc of previous row, ch 1, turn. Repeat Rows 2 and 3—3 more times.
Row 10: 1 sc in each st across. Fasten off. Make another piece like this.
Nose—Ch 6, join with sl st to form a ring.
Row 1: Ch 1, 9 sc with loops in ring, sl st into ch-1 at beginning of row.
Row 2: Ch 1, 1 sc with loops in each sc of previous row, sl st into ch-1 at beginning.
Repeat Row 2 until nose measures 1 inches. Fasten off.
Head—Ch 8, join with sl st to form a ring.
Row 1: Ch 3, 14 dc with loops in ring, sl st into ch-3 at beginning of row.
Row 2: Ch 3, * 1 dc with loop in first st, 2 dc with loops in next st * repeat between * to end of row, sl st into ch-3.
Row 3: Ch 3, * 1 dc with loop in first 2 sts, 2 dc with loops in next st * repeat between * to end of row, sl st into ch-3.
Row 4: Ch 3, * 1 dc with loop in next 3 sts, 2 dc with loops in next st * repeat to end of row, sl st into ch-3 at beginning.
Row 5: Ch 3, * 1 dc with loop in next 4 sts, 2 dc with loops in next st * repeat to end of row, sl st into ch-3 at beginning.
Rows 6, 7 and 8: Ch 3, 1 dc with loop in each st, sl st into ch-3 at beginning.
Rows 9 and 10: Work as for 8th row, but attach the nose on these 2 rows.
Row 11: Ch 3, 1 dc with loop in each st, sl st into ch-3 at beginning. Fasten off.
To make up: Sew small buttons or beads in place on face of dog, for eyes.
With black embroidery thread, embroider eyes, nose, mouth and feet as shown on picture. Work 2 sts with red thread, at corner of each eye.
Stuff body, head, tail and legs with kapok or cotton, then sew head to body; sew legs and ears in place as shown on picture, also tail.
Cut a small piece of red felt, or cotton material, and attach in place for tongue.
A large red ribbon bow will complete the puppy.
To wash when soiled—Remove stuffing and wash, shake well to fluff up loops and dry.
Striped Bedroom Rug Pattern
Sugar 'N Cream Pot Holder Patterns
Pots and Pans Pot Holder Patterns
Hearts Pot Holder Pattern
Diamonds Pot Holder Pattern
Bag Pattern
Crocheted Chenille Rug Pattern
Hot Dish Mats Pattern
Barbecue Mitts Pattern
Floral Rug Patterns
Super Absorbent Coasters Pattern
V's Table Mat Set Patterns
Blocks and Bands Table Mat Set Patterns
Lantana Blossoms Table Mat Set Patterns
Colonial Rug and Chair Seat Set Patterns
Kitten and Bunny Rug Pattern
Dutch Boy and Girl Rug Pattern
Initials in Puff Stitch Patterns
Hot Plate Mat and Pot Holder Patterns
Fluffy Puppy Toy Pattern
Posy Glass Muffs Pattern
Practical Hot Dish Mats Pattern
Chair Set and Placement Set Patterns
Mid-Riff Sweater Pattern
Soaker Pattern
Soaker Pattern
Dusting Glove Pattern
Shaggy Bearskin Rug Pattern


